The Mad Logic Behind My Vintage Crochet Pattern Edits
I love the editor of the magazine where I find most of the patterns that I publish. When someone writes in to ask a question about a pattern, she often begins her replies with “I scarcely see how the instructions could be more clear…” or “This answer has been given so often that it hardly seems necessary…”.
The questions from that magazine’s readers make it clear that many women in the first half of the 20th Century were a lot like us. Most were not expert needle artists, were busy, and wanted to use their spare time to make beautiful things.
Some people might think that my patterns are too long, or should have been left the way they were written 75 to 100 years ago. Before I started editing any patterns, I asked an intermediate crocheter how I should edit a pattern to make it easier for her to read. She said she would like to have everything spelled out, step by step. She had never done a pattern with more than a few repeated rows, and had never attempted any lace out of fear.
I know that you are busy. If you’re like me, you get your crocheting in while you wait at the doctor’s office or wait for sports or band practice to be over (though I have grown out of the waiting for kids part…). Sometimes you may not come back to a project for a few months. You want to be able to jump right back into it and without trying figure out all over again how to do certain things.
Crochet patterns are written the way they are in order to avoid repetition and to save ink and magazine space.
I edit vintage patterns for people who are using their iPads or Kindles to follow the written instructions. I know they won’t want to skip back and forth between pages.
Here are some of the instructions that I “fix” regularly:
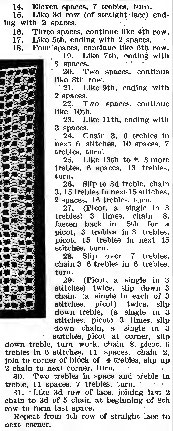
- Row instructions that say something like this: “Row 78: Like 22nd row to *”. Variations on this: the row you go back to has a spot that says “like 3rd row from *”. Another favorite is “like 3d row back from *”. I write these sorts of rows out so that you won’t have to flip pages back and forth or forget where you were.
- All symmetrical patterns have “work back from *” after the middle, unsymmetrical part has been done. This is actually not very hard to follow unless you have repeats in parentheses, at which point you’ll have to figure out which part inside the () you should do first. I write these “go backs” out so that you won’t have to stop and think.
- Repeated edges are usually shortened after the first few rows to “Edge;”. Most of the time, this would be no problem for most crocheters, but other times the edge is complicated and hard to keep track of. Again, I write it all out.
Other things that I do to enhance these vintage crochet patterns:
- When there are no written instructions, I figure them out and write them down. For example, Mary Card sometimes writes out the first few rows, and then says that you can easily work the rest from the photograph.
- Most patterns don’t have charts, so I make a chart from the photo or the written instructions.
Problems with vintage patterns I have come across:
- Written instructions with some rows written backwards.
- Photos of finished lace samples with grievous errors.
- Photos with minor errors.
It takes me between four and twelve hours to scan and edit an old filet crochet pattern and make charts. The time is worth it for me, because I love to make them accessible for you.